EmDash is a full-stack TypeScript CMS built on Astro — often described as the spiritual successor to WordPress. It combines a modern admin interface with Astro's rendering performance, Portable Text for structured content, and passkey-first authentication. If you're building a content-driven site with EmDash and need reliable, repeatable deployments from Git, DeployHQ makes the process straightforward.
In this guide, you'll set up an EmDash project for Node.js deployment, connect it to DeployHQ, configure your build pipeline, and deploy to a VPS or cloud server with zero manual file transfers.
What Is EmDash?
EmDash is an open-source CMS that runs as an Astro integration. Unlike traditional CMSs that bolt a content API onto a separate frontend, EmDash ships everything in one project — the admin panel, content editor, authentication, media management, and your frontend templates.
A few things that set EmDash apart:
- Astro-native: Your site is an Astro project. EmDash adds the CMS layer as an integration, so you keep full control over routing, components, and rendering.
- Portable Text editor: Content is stored as structured JSON (via TipTap), not raw HTML. This makes content reusable across different presentation formats.
- Passkey-first auth: No passwords by default. Users authenticate with WebAuthn passkeys, with OAuth and magic links as fallbacks.
- Schema-in-database: Content collections are defined in the database, not in code files. This means editors can create new collections without touching the codebase.
- Plugin system: Extensible via a
definePlugin()API with sandboxed execution on Cloudflare or in-process on Node.js.
EmDash supports multiple deployment targets — Cloudflare Workers, Docker containers, or plain Node.js servers. This guide focuses on Node.js deployment via DeployHQ, which covers VPS hosting, cloud instances, and dedicated servers.
Prerequisites
Before starting, make sure you have:
- Node.js 22.12.0 or later installed on both your local machine and your deployment server
- A Git repository (GitHub, GitLab, or Bitbucket) containing your EmDash project
- A DeployHQ account — you can sign up for a free trial if you don't have one
- SSH access to your server with Node.js 22+ installed
- A process manager like PM2 or systemd configured on your server
If you haven't created an EmDash project yet, scaffold one with:
npm create emdash@latest my-site
cd my-site
npm install
This generates an Astro project with EmDash pre-configured. The scaffolder lets you choose from blog, marketing, or portfolio templates.
Preparing EmDash for Production
EmDash requires server-side rendering — it's a full-stack CMS, not a static site generator. Your Astro config must use the Node.js adapter in standalone mode.
Configure the Astro Adapter
Open your astro.config.mjs and verify the Node.js adapter is set to standalone:
// astro.config.mjs
import { defineConfig } from 'astro/config';
import node from '@astrojs/node';
import emdash from 'emdash';

export default defineConfig({
  output: 'server',
  adapter: node({
    mode: 'standalone',
  }),
  integrations: [emdash()],
});
The standalone mode is critical — it produces a self-contained server entry point at ./dist/server/entry.mjs that you can run directly with Node.js. The alternative middleware mode is for platforms like Express where you manage the HTTP server yourself, but standalone is simpler for DeployHQ deployments.
Generate Authentication Secrets
EmDash needs two secrets for production: one for signing session cookies and another for preview URLs. Generate them locally:
npx emdash auth secret
This outputs a cryptographically secure random string. Run it twice — once for EMDASH_AUTH_SECRET and once for EMDASH_PREVIEW_SECRET. Save both values; you'll add them as environment variables in DeployHQ.
Choose Your Database
EmDash supports several database backends. For a Node.js deployment via DeployHQ, the practical options are:
| Database | Best For | Configuration |
|---|---|---|
| SQLite | Single-server deployments | Set DATABASE_PATH to a persistent directory |
| PostgreSQL | Multi-server or production-critical sites | Set DATABASE_URL connection string |
| libSQL (Turso) | Remote SQLite with replication | Set LIBSQL_DATABASE_URL and LIBSQL_AUTH_TOKEN |
SQLite is the simplest choice for a single VPS — no external database server needed. Just make sure the database file lives on a persistent volume, not in the deployment directory (since DeployHQ replaces files on each deploy).
For SQLite, create a data directory outside your deployment path:
# On your server, create a persistent data directory
mkdir -p /var/data/emdash
chown deploy:deploy /var/data/emdash
Then set the environment variable to point there:
DATABASE_PATH=/var/data/emdash/emdash.db
Add a Start Script
Verify your package.json includes a start script:
{
  "scripts": {
    "dev": "astro dev",
    "build": "astro build",
    "start": "node ./dist/server/entry.mjs",
    "bootstrap": "emdash init && emdash seed"
  }
}
The build command compiles your Astro project into the dist/ directory. The start command runs the compiled server. DeployHQ will execute build during deployment and your process manager will run start on the server.
Setting Up DeployHQ
With your EmDash project in Git and your server ready, connect everything through DeployHQ.
Create a New Project
- Log in to DeployHQ and click New Project
- Name it (e.g.,
EmDash Blog
) and select the server region closest to your deployment target - Connect your Git repository — DeployHQ supports GitHub, GitLab, Bitbucket, and self-hosted Git servers
Configure the Server
Add your deployment server under Servers in the project settings:
- Click New Server
- Choose SSH/SFTP as the protocol
- Enter your server hostname, SSH port, and the deploy user credentials
- Set the Deployment Path to where your application lives, for example
/var/www/emdash - Test the connection to verify DeployHQ can reach your server
Configure the Build Pipeline
This is where DeployHQ handles your Node.js build. Navigate to Build Pipeline in your project settings:
- Enable the build pipeline
- Select Node.js 22 as the build environment
- Add the build commands:
npm ci
npm run build
Using npm ci instead of npm install ensures a clean, reproducible install from your lockfile — important for consistent deployments.
DeployHQ's build pipeline runs these commands in an isolated container, compiles your Astro project, and then deploys only the output files to your server. This means your server doesn't need to run npm install or npm run build — it just receives the compiled application.
Set Environment Variables
Under Environment Variables in your project settings, add:
| Variable | Value |
|---|---|
EMDASH_AUTH_SECRET |
Your generated auth secret |
EMDASH_PREVIEW_SECRET |
Your generated preview secret |
DATABASE_PATH |
/var/data/emdash/emdash.db (for SQLite) |
HOST |
0.0.0.0 |
PORT |
4321 (or your preferred port) |
If you're using PostgreSQL instead, replace DATABASE_PATH with DATABASE_URL pointing to your connection string.
DeployHQ encrypts environment variables at rest, so your secrets are protected. These variables are available during the build step and can also be written to a .env file on the server if your application reads from one.
Configure Deployment Exclusions
Not every file needs to reach your server. Under Excluded Files, add:
src/
tests/
node_modules/
.git/
tsconfig.json
astro.config.mjs
README.md
Wait — you actually need node_modules on the server because dist/server/entry.mjs requires runtime dependencies. There are two approaches:
Approach A — Deploy node_modules (simpler): Don't exclude node_modules. DeployHQ transfers the full project including dependencies. This is slower but requires no server-side commands.
Approach B — Install on server (cleaner): Exclude node_modules and add a post-deploy SSH command to install production dependencies:
cd /var/www/emdash && npm ci --omit=dev
Approach B is preferred for larger projects because it only installs production dependencies, keeping the server lean.
Deploying EmDash
First Deployment
Your first deployment needs extra setup because the database doesn't exist yet. After the initial deploy completes:
- SSH into your server
- Navigate to your deployment directory
- Run the bootstrap command to initialise the database:
cd /var/www/emdash
npm run bootstrap
This creates the database schema and optionally seeds sample content. You only need to run this once.
- Start the application:
# Using PM2 (recommended)
pm2 start dist/server/entry.mjs --name emdash

# Or using systemd (see next section)
- Visit
http://your-server:4321/_emdash/adminto complete the setup wizard — set your site title, tagline, and register your admin passkey.
Set Up a Process Manager
For production, use PM2 or systemd to keep EmDash running and restart it on crashes or reboots.
PM2 ecosystem file (ecosystem.config.cjs):
// ecosystem.config.cjs
module.exports = {
  apps: [{
    name: 'emdash',
    script: './dist/server/entry.mjs',
    env: {
      HOST: '0.0.0.0',
      PORT: 4321,
      DATABASE_PATH: '/var/data/emdash/emdash.db',
      NODE_ENV: 'production',
    },
    instances: 1,
    autorestart: true,
    max_memory_restart: '512M',
  }],
};
Note: if you're using SQLite, keep instances: 1. SQLite doesn't handle concurrent writes from multiple processes well. For multi-instance deployments, switch to PostgreSQL.
systemd service (/etc/systemd/system/emdash.service):
[Unit]
Description=EmDash CMS
After=network.target

[Service]
Type=simple
User=deploy
WorkingDirectory=/var/www/emdash
ExecStart=/usr/bin/node dist/server/entry.mjs
Restart=on-failure
Environment=NODE_ENV=production
Environment=HOST=0.0.0.0
Environment=PORT=4321
Environment=DATABASE_PATH=/var/data/emdash/emdash.db
EnvironmentFile=/var/www/emdash/.env

[Install]
WantedBy=multi-user.target
Automate Restarts with Post-Deploy Commands
After each deployment, EmDash needs to restart so it picks up the new code. Add a post-deploy SSH command in DeployHQ under SSH Commands → After Deployment:
cd /var/www/emdash && pm2 restart emdash
Or for systemd:
sudo systemctl restart emdash
This ensures every successful deployment automatically restarts the application without manual intervention.
Subsequent Deployments
After the initial setup, the deployment workflow is:
- Push code changes to your Git repository
- DeployHQ detects the push (via webhook) and starts a deployment
- The build pipeline runs
npm ci && npm run build - Compiled files are transferred to your server
- The post-deploy command restarts the application
You can also configure DeployHQ to deploy automatically on every push to your main branch, or keep deployments manual and trigger them from the DeployHQ dashboard.
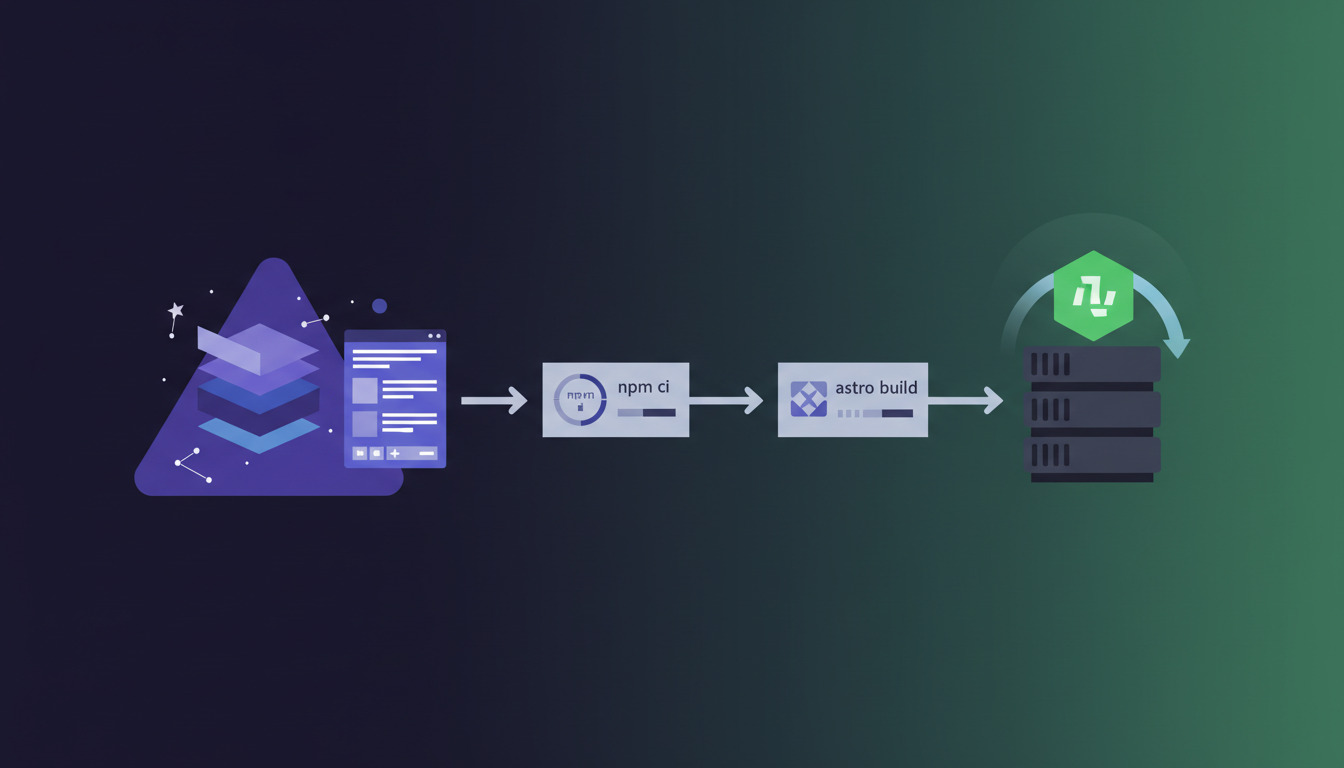
Deployment Architecture
Here's how the pieces fit together:
flowchart LR
    A[Git Push] --> B[DeployHQ]
    B --> C[Build Pipeline<br/>npm ci + astro build]
    C --> D[Transfer Files<br/>via SSH]
    D --> E[VPS / Cloud Server]
    E --> F[PM2 / systemd<br/>Restart]
    F --> G[EmDash Running<br/>port 4321]
    G --> H[Reverse Proxy<br/>nginx / Caddy]
    H --> I[Public Traffic<br/>HTTPS on port 443]
DeployHQ handles steps A through F. You configure the reverse proxy once during initial server setup.
Setting Up a Reverse Proxy
In production, you'll want a reverse proxy in front of EmDash to handle HTTPS, compression, and static asset caching. Here's a minimal nginx configuration:
server {
    listen 443 ssl http2;
    server_name your-domain.com;

    ssl_certificate /etc/letsencrypt/live/your-domain.com/fullchain.pem;
    ssl_certificate_key /etc/letsencrypt/live/your-domain.com/privkey.pem;

    location / {
        proxy_pass http://127.0.0.1:4321;
        proxy_http_version 1.1;
        proxy_set_header Upgrade $http_upgrade;
        proxy_set_header Connection 'upgrade';
        proxy_set_header Host $host;
        proxy_set_header X-Real-IP $remote_addr;
        proxy_set_header X-Forwarded-For $proxy_add_x_forwarded_for;
        proxy_set_header X-Forwarded-Proto $scheme;
        proxy_cache_bypass $http_upgrade;
    }
}
If you prefer Caddy, the configuration is even simpler:
your-domain.com {
    reverse_proxy localhost:4321
}
Caddy handles TLS certificates automatically via Let's Encrypt — no manual certificate setup needed.
Troubleshooting
Build Fails with Cannot find module
Errors
This usually means dependencies aren't installed correctly. Make sure your package-lock.json is committed to Git. DeployHQ's build pipeline runs npm ci, which requires a lockfile. If you're using pnpm locally, either switch DeployHQ to use pnpm install && pnpm build or add a package-lock.json alongside.
Application Starts but Admin Panel Returns 404
EmDash's admin routes live under /_emdash/admin. Make sure your Astro config has output: 'server' — if it's set to 'static' or 'hybrid', the server-side routes won't work.
Database Errors After Deployment
If you're using SQLite and see database is locked
or no such table
errors:
- Verify
DATABASE_PATHpoints to a directory outside the deployment path (so it persists between deployments) - Make sure the deploy user has write permissions to the database directory
- Run
npm run bootstrapif the database hasn't been initialised yet
Passkey Authentication Fails
Passkeys require HTTPS. If you're testing over plain HTTP, passkey registration and login will fail. Set up your reverse proxy with TLS first, or use the dev bypass endpoint for initial testing:
https://your-domain.com/_emdash/api/setup/dev-bypass?redirect=/_emdash/admin
Remove this bypass in production by ensuring NODE_ENV=production is set.
Deployment Succeeds but Site Shows Old Content
The post-deploy restart command might not be running. Check the DeployHQ deployment log for SSH command output. Also verify that PM2 or systemd is actually restarting the correct process — run pm2 list or systemctl status emdash on the server to confirm.
Frequently Asked Questions
Can I use DeployHQ's atomic deployments with EmDash?
Yes. DeployHQ's zero downtime deployments work well with EmDash. Each deployment goes into a new directory, and a symlink switches to the new version atomically. Just make sure your DATABASE_PATH and any uploaded media point to a shared directory outside the release path so they persist across deployments.
Does EmDash work with DeployHQ's build pipeline caching?
The build pipeline caches node_modules between deployments, so subsequent builds are faster since npm only installs changed dependencies. Astro's build output isn't cached (it rebuilds each time), but the dependency caching alone can cut build times significantly.
Can I deploy EmDash to shared hosting via FTP?
EmDash requires a long-running Node.js process, which most shared hosting plans don't support. You need a VPS, cloud instance, or container hosting where you can run node dist/server/entry.mjs persistently. DeployHQ supports FTP and SFTP deployment protocols, but the server itself must support Node.js 22+.
How do I handle database migrations during deployment?
EmDash automatically runs migrations when the application starts (for SQLite, libSQL, and PostgreSQL). There's no separate migration step needed in your deployment pipeline. The restart via PM2 or systemd triggers the migration check on boot.
Can multiple team members deploy independently?
Yes. DeployHQ supports team collaboration with role-based permissions. You can restrict who can trigger deployments while giving everyone read access to deployment logs. Combined with DeployHQ's deployment approvals, you can require sign-off before production deployments go live.
Next Steps
You now have a production EmDash deployment powered by Git-based automation through DeployHQ. Every push to your repository triggers a clean build and deployment — no manual file transfers, no SSH-ing into servers to run commands.
From here, you might want to:
- Set up deployment notifications to get Slack or email alerts on each deploy
- Configure a staging server in DeployHQ to test changes before they hit production
- Explore EmDash's plugin system to extend your CMS with custom functionality
- Add a build pipeline step for running tests before deployment
Ready to automate your EmDash deployments? Sign up for DeployHQ and connect your repository in minutes.
If you have questions about deploying EmDash or any other framework with DeployHQ, reach out to us at support@deployhq.com or on Twitter/X @deployhq.