Publishing local changes
What's a remote repository?
Until now, the changes you've have made have only been saved to your own computer. If you want others to see the changes you've made, you'll need to upload them to a remote server which is accessible to everyone you want to work with.
This process is called "pushing" your code.
Where can you host your repository?
There are numerous services that let you host your Git repositories. However, here are a number of the most popular services that I'd recommend trying out:
These services let you do all the things you'd expect like:
- Viewing the files in your project.
- Displaying a list of recent commits.
- Showing the changes that happened in an specific commit.
That's not all though! Git hosting providers typically come bundled with a wide range of extra features designed to make working with others much easier.
In this tutorial, I'll walk you through pushing your repository to GitHub because it's the most popular and it's used by the majority of open source projects.
You're more than welcome to use whichever hosting provider you want, however the steps may be slightly different depending on the service you choose.
Creating the remote repository
Once you've registered for a GitHub account and signed in, click the "New" button to create a new repository (or click here).
The repository creation form will look a little something like this:
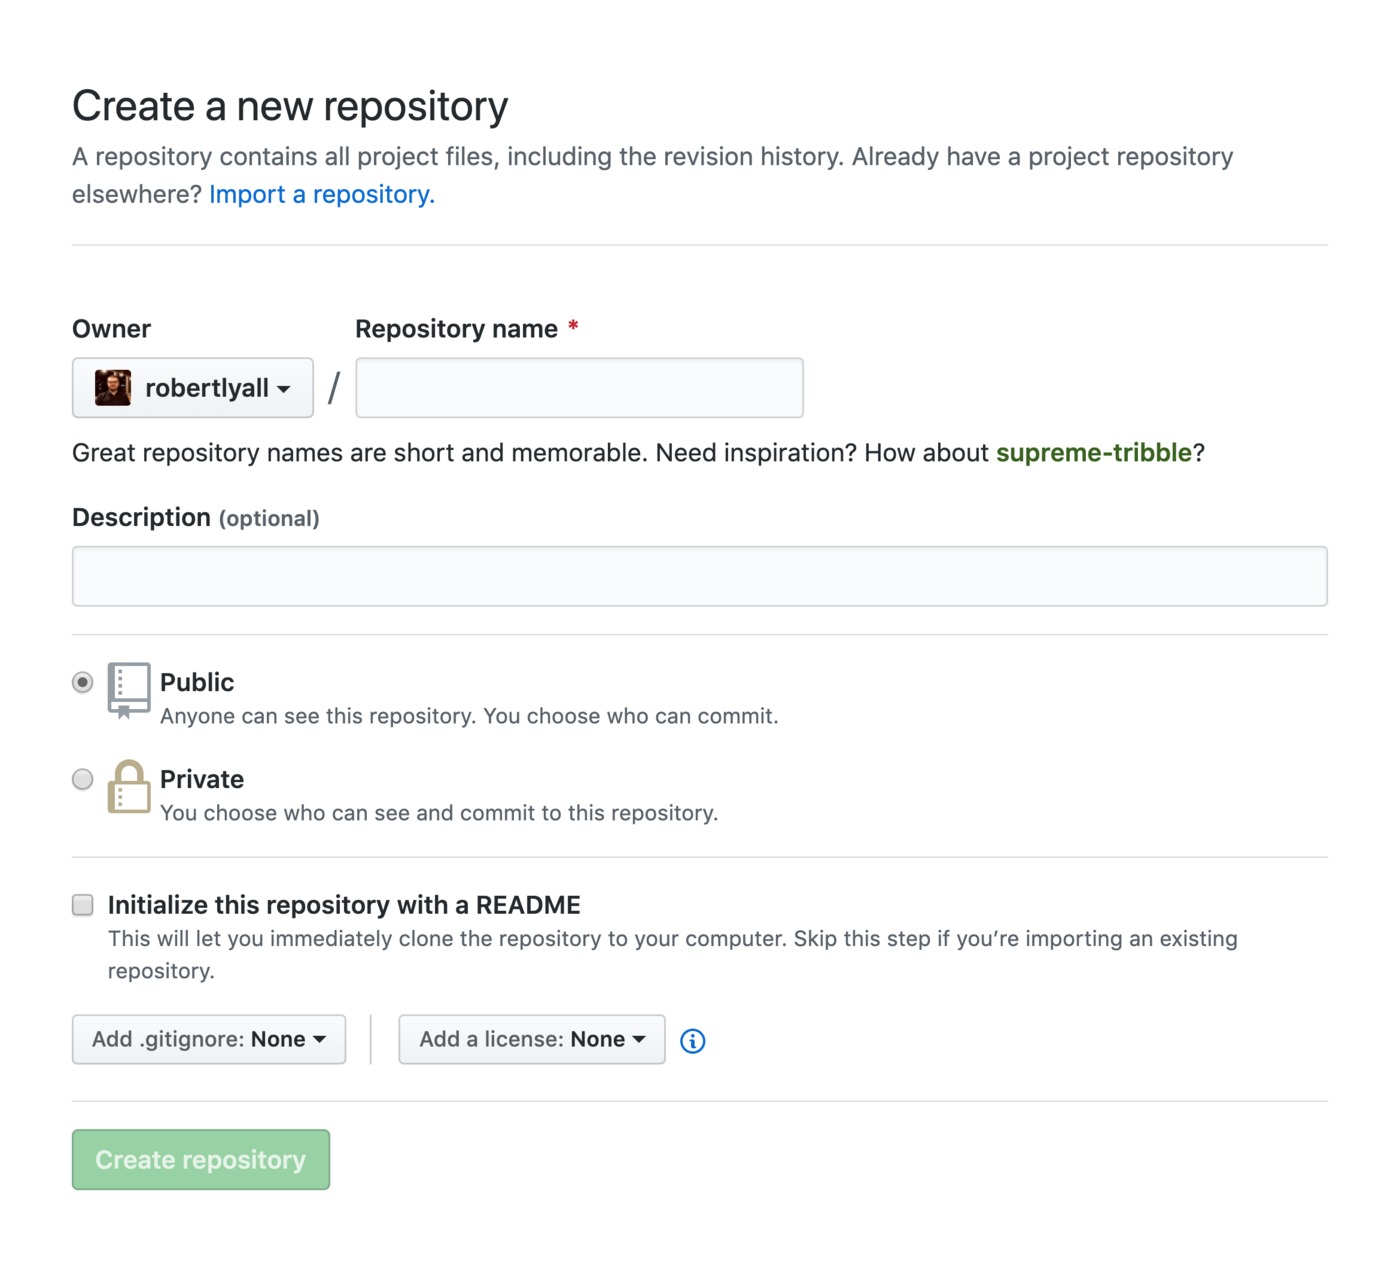
Choosing a name
A repository name is a short name for your project. It can be something as simple as “app”, “blog” or “website”. This name can be changed at anytime in the future, so don't worry if your project doesn't have an official name yet.
Repository descriptions are entirely optional, however it's often a good idea to jot down a simple one-line summary to remind you what the project does.
Public vs. Private
Next, you need to choose between creating a public or private repository.
Public repositories are accessible to everyone. Other developers will be able to freely view your code, see the commit history, and clone the repository to their own computer. Don't worry, they won't be able to freely push changes.
Private repositories are initially only accessible by yourself, however you can invite a limited number of "collaborators" on GitHub's free plan. Developers need the correct permissions in order to view, clone, or push to the repository.
So, which should you choose?
- Public if you're happy for others to read your code.
- Private if you'd rather keep your code, well, private.
Note: A public repository can be made private at any time (and vice versa).
The remaining fields
We’re going to be importing an existing repository (from your own computer), so the remaining fields are going to be left blank.
Click on "Create Repository" when you're ready to continue.
Adding the remote repository URL
Once you've created the repository, it's time to add it as a remote and push to it. The empty repository screen GitHub displays after you create your repository actually has a very nice list of instructions.
There are two protocols you can use when working with Git; HTTPS and SSH. If you change the protocol at the top, GitHub will change the instructions below.

Not sure which protocol to use? Check out this article on the GitHub Help site.
Note: Make sure you're in the project's working directory on the command line before proceeding with the next steps.
HTTPS
You'll need to enter your GitHub username and password every time you clone, fetch, pull or push to a remote repository using HTTPS URLs.
To add the remote repository URL, type the following command making sure to replace the HTTPS URL with the one for your own project.
git remote add origin https://github.com/robertlyall/shop.git
SSH
In order to use the SSH protocol, you'll need to generate an SSH key and add it to your GitHub account on the "SSH and GPG keys" page found under Settings.
Once you've done that, type the following command to add the remote repository URL. Make sure you replace the SSH URL with the one for your own project.
git remote add origin git@github.com:robertlyall/shop.git
Learn more about setting up SSH for commit signing here.
Pushing your local repository
Once you've added the remote repository URL using you preferred protocol, it's time to actually push you repository to GitHub.
git push -u origin master
A few seconds later, you should see output like this:
Counting objects: 27, done.
Delta compression using up to 8 threads.
Compressing objects: 100% (25/25), done.
Writing objects: 100% (27/27), 44.39 KiB | 6.34 MiB/s, done.
Total 27 (delta 2), reused 0 (delta 0)
remote: Resolving deltas: 100% (2/2), done.
To github.com:robertlyall/shop.git
 * [new branch]      master -> master
Branch 'master' set up to track remote branch 'master' from 'origin' by rebasing.
The -u origin master part of this command essentially links your local master branch with the master branch on the origin remote.
Note: The name "origin" is just a convention used by developers using Git - you don't need to worry about it too much.
Pushing a new branch
When you create a local branch that doesn't exist on the remote yet, a regular git push won't work. Git will tell you:
$ git push
fatal: The current branch my-feature has no upstream branch.
To push the current branch and set the remote as upstream, use

    git push --set-upstream origin my-feature
Run the suggested command to create the remote branch and set up tracking in one step:
$ git push --set-upstream origin my-feature
After this, future pushes from that branch only need git push. You can also use the shorthand -u flag: git push -u origin my-feature.
Force pushing
Sometimes you need to overwrite the remote history — for example, after rebasing a feature branch. A regular git push will be rejected because the histories have diverged:
$ git push
 ! [rejected]        my-feature -> my-feature (non-fast-forward)
You can force the push, but use --force-with-lease instead of --force:
$ git push --force-with-lease origin my-feature
--force-with-lease checks that no one else has pushed to the branch since your last fetch. If they have, it refuses the push — protecting you from accidentally overwriting a teammate's work. Plain --force skips this check entirely, which can cause lost commits. Never force push to shared branches like main without coordinating with your team.
Pushing tags
By default, git push doesn't send tags to the remote. To push a specific tag:
$ git push origin v1.4.0
To push all tags at once:
$ git push --tags
Common push errors
"Updates were rejected" — The remote has commits you don't have locally. Run git pull first to integrate the remote changes, then push again.
"Permission denied (publickey)" — Your SSH key isn't configured for this remote. Check your SSH agent and the remote's access settings.
"Repository not found" — Double-check the remote URL with git remote -v. The repository may have been renamed or you may not have access.
Automatic deployments with DeployHQ
With DeployHQ, pushes to your repository can automatically trigger deployments to your server — no manual steps needed. Map branches to environments and every push kicks off the right deployment.