If your application is already containerised, deploying it should be the easy part — but most teams end up wiring the same fragile bash by hand into a GitHub Action or a long-lived CI runner. This guide covers the shorter path: a Docker container deployment workflow on a VPS or dedicated server, driven by a DeployHQ Shell Server, with a Git push as the only trigger.
Shell Servers are the right starting point when you control the host. You run docker on your own box, DeployHQ runs the orchestration. If you're deploying to AWS ECS or EKS instead, hand off to the dedicated guide on deploying containerised apps to ECS and EKS — that workflow uses Custom Actions and ECR, and it covers the parts (task definitions, services-stable waits, kubectl rollout) that a Shell Server won't.
When Shell Servers fit and when they don't
Shell Servers run your script over SSH against a host you own — a Hetzner, DigitalOcean, OVH, or on-prem box with the Docker daemon installed. Nothing is uploaded; only the commands you write run remotely. That fits four very common shapes:
- A single VPS running 1-10 containers behind Caddy, Traefik, or Nginx
- A small Docker Compose stack (app + Postgres + Redis) that needs a coordinated restart
- A self-hosted internal tool that you want updated on every push to
main - A staging server where you want every PR branch to deploy automatically
It does not fit ECS, EKS, GKE, Fargate, or any managed orchestrator — those have no shell to SSH into. For those, use Custom Actions, which spin up a managed container per deploy and run AWS CLI or kubectl against the cluster API.
Prerequisites
Before the first deploy you need:
- A DeployHQ account on a plan that includes Shell Servers
- A Linux server (Ubuntu 22.04 LTS or 24.04 LTS recommended) reachable over SSH on port 22 (or a port you'll specify)
- Docker Engine 24.0+ installed on that server. The official Docker convenience script is the fastest path; the distro-packaged
docker.iolags by several releases and is missing BuildKit defaults - Docker Compose v2 if you're running multi-container stacks. It's bundled as
docker compose(no hyphen) with modern Docker Engine — verify withdocker compose version - The deploy user added to the
dockergroup (sudo usermod -aG docker deploy && newgrp docker) so it can rundockerwithoutsudo - Read/write access to your container registry. For Docker Hub: a Personal Access Token, not your account password. For AWS ECR: an IAM user with
ecr:GetAuthorizationToken,ecr:BatchGetImage, andecr:PutImage - Your Git repository connected to DeployHQ — both deploy from GitHub and deploy from GitLab work the same way
The Docker cheatsheet covers the host-side commands referenced throughout this guide — docker system prune, docker image ls --filter, docker logs --since, and the diagnostic flags you'll want when a deploy goes sideways.
Step 1: Add the Shell Server to DeployHQ
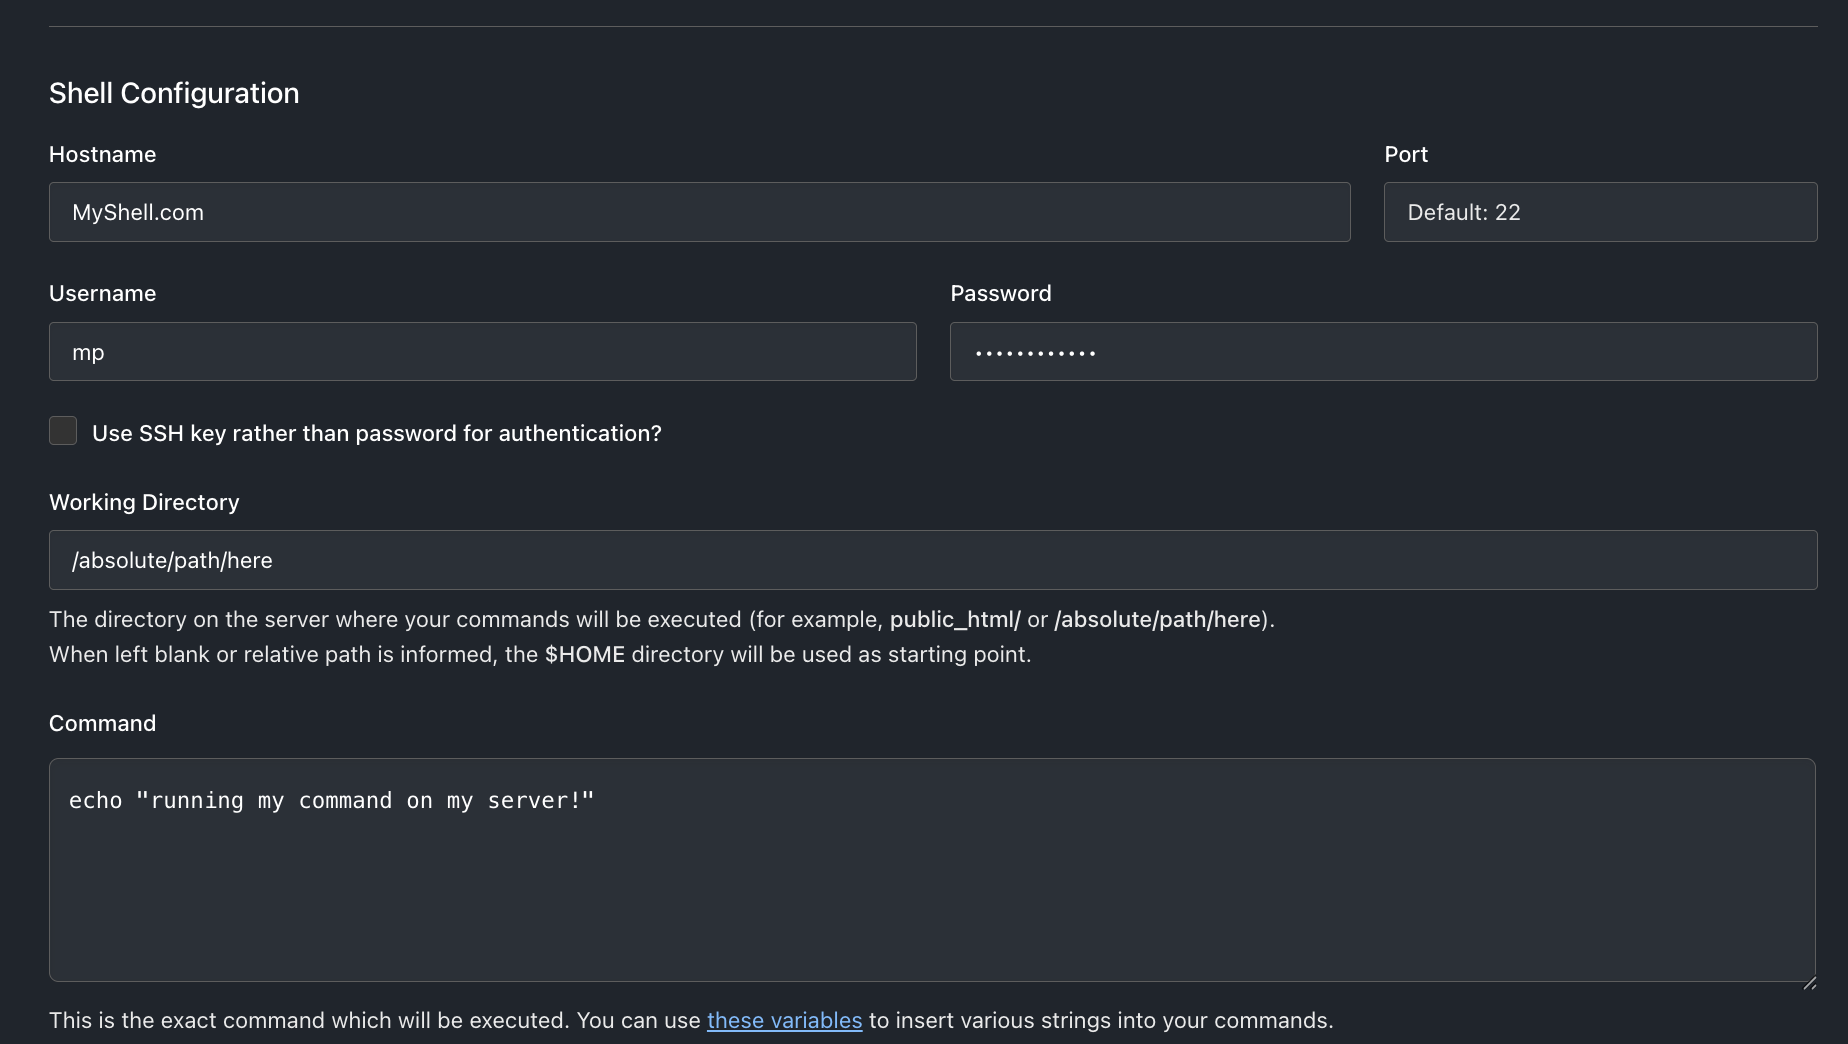
Inside your project, go to Servers & Groups > New Server and pick Shell. The fields that matter:
- Hostname: IP or DNS name of the box
- Username: the user with
dockergroup membership - Port: 22 unless you've moved it
- SSH key: paste your project's public key into the server's
~/.ssh/authorized_keys. Password auth works but you'll regret it the first time you rotate - Working directory: where your repo will be checked out for the deploy.
/srv/myappis a reasonable convention
Smoke-test the connection with Test Connection before continuing. If it fails, 90% of the time it's Permission denied (publickey) because the key isn't in authorized_keys, or the wrong user.
Step 2: Write a Dockerfile that's actually deployable
Most Docker container deployment problems are baked in at the Dockerfile stage. The minimal Dockerfile you find on Docker's getting-started page works for docker run on your laptop, but it has three problems that show up on the second deploy.
Here's a production-leaning Dockerfile for a Python Flask app. The patterns are the same for Node, Ruby, Go, or Java — only the base image and dependency-install commands change.
# syntax=docker/dockerfile:1.7
FROM python:3.12-slim AS base

# Don't run as root in the container
RUN useradd --create-home --uid 1000 app

WORKDIR /app

# Install deps separately from app code so the layer caches across deploys
COPY requirements.txt ./
RUN pip install --no-cache-dir -r requirements.txt

# Now copy application code — invalidates only when code changes
COPY --chown=app:app . .

USER app

EXPOSE 5000

# tini handles SIGTERM properly; without it `docker stop` SIGKILLs after 10s mid-request
ENTRYPOINT ["/usr/bin/tini", "--"]
CMD ["python", "app.py"]
The three fixes most starter Dockerfiles get wrong:
COPY requirements.txtbeforeCOPY . .— keeps the dependency layer cached. Without it,pip installre-runs on every code change, turning 10-second builds into 90-second ones- A non-root
appuser withUSER app— if your app process is compromised, the blast radius is the container's filesystem, not root in the container tinias the entrypoint — Python and Node don't forwardSIGTERMto child processes, sodocker stopwaits 10 seconds thenSIGKILLs mid-request.tiniis a 220KB init that reaps zombies and forwards signals correctly
The full pattern for Node, including multi-stage builds and the .dockerignore that goes with it, is in the production-ready Node.js Dockerfile walkthrough.
Build and test locally before pushing — if it doesn't run on your laptop, the registry push is wasted work:
docker build -t myapp:dev .
docker run --rm -p 5000:5000 myapp:dev
Step 3: Push to a container registry
Your Shell Server pulls the image; it doesn't build it. That means the build either happens (a) on a DeployHQ build pipeline before the Shell Server step runs, or (b) on the Shell Server itself if it has spare CPU and RAM. Build pipelines are the cleaner pattern because they decouple build from deploy and surface failures earlier — see what a build pipeline actually does for the model.
Tag with the Git commit SHA — never with :latest alone:
# In a DeployHQ build pipeline, ${REVISION} is the commit SHA
IMAGE=myorg/myapp:${REVISION}

docker login --username myorg --password-stdin <<< "${DOCKERHUB_TOKEN}"
docker build -t $IMAGE -t myorg/myapp:latest .
docker push $IMAGE
docker push myorg/myapp:latest
Why both tags? :${REVISION} is what you pull on the Shell Server (immutable, traceable, rollback-friendly). :latest is what your local docker compose pull grabs for development. If you only push :latest, you've thrown away your rollback target — a 30-second incident becomes a 30-minute one.
Set DOCKERHUB_TOKEN, AWS_ACCESS_KEY_ID, and any other secrets as environment variables in Project Settings > Environment Variables, marked as protected so they don't leak into logs. If you need encrypted-at-rest secrets you can commit alongside your repo, the Dotenvx encrypted env workflow handles that without a second secrets store. For AWS ECR registries, the login is a one-liner — see the AWS CLI cheatsheet for the exact aws ecr get-login-password invocation and the surrounding session patterns.
Step 4: The Shell Server deploy script
This is the only script you actually maintain. It runs on the target host as the deploy user, with the repo not uploaded — the Shell Server runs commands, it doesn't transfer files. Anything you need from the repo (a docker-compose.yml, Kubernetes manifests, migration scripts) either lives on the box already, gets fetched by the script, or comes from your registry inside the image.
For a single-container app:
#!/bin/bash
set -euo pipefail

IMAGE="myorg/myapp:${REVISION}"
CONTAINER=myapp

echo "Pulling $IMAGE..."
docker pull "$IMAGE"

echo "Stopping previous container (if any)..."
docker rm -f "$CONTAINER" 2>/dev/null || true

echo "Starting new container..."
docker run -d \
  --name "$CONTAINER" \
  --restart unless-stopped \
  -p 5000:5000 \
  --env-file /etc/myapp/.env \
  "$IMAGE"

echo "Waiting for health check..."
for i in {1..30}; do
  if curl -fsS http://localhost:5000/healthz >/dev/null; then
    echo "Healthy after ${i}s"
    docker image prune -f --filter "until=72h" >/dev/null
    exit 0
  fi
  sleep 1
done

echo "Health check failed — rolling back"
docker rm -f "$CONTAINER"
docker run -d --name "$CONTAINER" --restart unless-stopped \
  -p 5000:5000 --env-file /etc/myapp/.env "myorg/myapp:previous"
exit 1
Two details to call out:
- The 30-second health-check loop turns this from
did the container start
(always true) intois the new revision serving traffic.
Without it DeployHQ will report success even when the app is crash-looping. The loop is the same shape as theservices-stablewait that ECS gives you for free docker image prune --filter "until=72h"keeps the disk from filling up with old image layers. Three days is enough to roll back to anything from the last week's deploys; tighten or loosen as your disk allows
For a Compose stack, the deploy is docker compose pull && docker compose up -d --remove-orphans — Compose handles the container churn and respects depends_on and health checks defined in the YAML. Keep the YAML in /srv/myapp/docker-compose.yml on the server, version-controlled separately or synced via a build pipeline.
Start the deploy script with
set -euo pipefail. Without it, a faileddocker pull(image not found, registry down) returns non-zero, your script keeps going, and the nextdocker runhappily starts the previous image — silent rollback to yesterday's bug.set -emakes the script halt on the first failure;-ucatches undefined variables;-o pipefailpropagates exit codes through pipes.
Step 5: Automate on every push
The whole point of this setup is that you don't run anything manually after the first deploy. In Project Settings > Automatic Deployments, enable deployment for the branch (main for production, staging for staging) and copy the webhook URL into your GitHub or GitLab repository's Settings > Webhooks. The GitHub webhook setup guide walks through the exact steps; GitLab is identical in shape.
From here, the full loop is: git push → DeployHQ runs the build pipeline (image build + push to registry) → DeployHQ runs the Shell Server script (pull + restart + health check) → success or one-click rollback on the dashboard if the health check failed.
Need to verify your project's deployment safety story before going live? Sign up for DeployHQ and run the first deploy against a staging server — the free tier includes one project and unlimited deploys, which is enough to wire up the full pipeline before you commit.
Production gotchas this workflow doesn't solve
Shell Server deployments are good but they aren't free of trade-offs. Three you'll hit:
- No automatic blue/green. The script above stops the old container and starts the new one, with a few seconds of 502 in between unless your reverse proxy (Caddy, Traefik, Nginx) has retry-on-fail configured. For real zero-downtime on a single host, run two container versions side by side behind the proxy and flip the upstream — covered in the zero-downtime deployments feature page
- No horizontal scale. One host, one running version. For multi-host orchestration, ECS/EKS or a managed Kubernetes is the right next step
- State management is on you. Volumes, named volumes vs bind mounts, Postgres data outside the container — Docker doesn't help you here. The deploy script must never destroy a volume on rollback. Use
docker volume lsto audit what's persistent before automating
If you want a worked Compose example end-to-end on Ubuntu, the Metabase Docker Compose walkthrough covers the YAML, the systemd unit, and the same Shell Server deploy script applied to a multi-container stack.
Conclusion
Docker container deployment with a DeployHQ Shell Server replaces three things at once: the GitHub Action that's almost-but-not-quite right, the EC2 runner that nobody patches, and the bash one-liner in someone's terminal that nobody else can reproduce. You write one script, the Shell Server runs it on every push, the build pipeline keeps your image immutable per commit, and rollback is a single click. That's the workflow.
For the Docker primer if any of this felt like a fast skim, see what Docker is and how containers, images, and registries fit together. For the orchestrator-side command reference when you graduate to Kubernetes, the kubectl cheatsheet is the page to bookmark.
Questions or running into a deploy that won't behave? Email us at support@deployhq.com or ping us on X (Twitter).
FAQs
What's the difference between a DeployHQ Shell Server and a Custom Action for Docker deployments?
A Shell Server runs your script over SSH on a host you own — your Hetzner box, your bare-metal server, your home lab. A Custom Action runs in a managed container that DeployHQ spins up per deploy, with no persistent host to maintain — that's what you use for ECS, EKS, or anywhere there's no SSH-able machine. Shell Servers fit single-VPS and small Compose stacks; Custom Actions fit cloud-native orchestrators.
Why tag images with the commit SHA instead of :latest?
Because rollback is then a single docker pull myorg/myapp:<previous-sha> && docker run ... against a specific, named image. With :latest-only, the previous version has been overwritten in the registry and there's nothing to roll back to. Tagging with ${REVISION} (the commit SHA) gives you an immutable per-deploy artefact that pairs with the rollback button on the DeployHQ dashboard.
Do I need a build pipeline, or can the Shell Server build the image too?
Either works. The Shell Server can run docker build and docker push if it has spare CPU and RAM. A build pipeline is cleaner because it decouples build from deploy — the build runs on DeployHQ's infrastructure, the deploy runs on your server, and a build failure never touches the production host. For production setups, prefer the build pipeline.
How do I keep registry credentials out of my repo?
Store them as Environment Variables under Project Settings, marked as protected. They get injected into the build pipeline and Shell Server session at deploy time. Never commit .env files, Docker config JSON, or AWS credentials into the repo — even private repositories leak via forks, mistakes, and git log --all.
Can I deploy Docker Compose stacks the same way?
Yes — replace the docker run step in Step 4 with docker compose pull && docker compose up -d --remove-orphans. Keep the docker-compose.yml on the server (in the working directory you configured for the Shell Server) and let the script trigger Compose to reconcile. The same health-check loop applies — wait for the new containers to be healthy before reporting success.